
Nowadays, you can see scanners humming beside surveyors, some drones mapping rooftops, and cloud dashboards that pull everything together before the concrete dries. The modern technology now does the task in hours, which once took days of field verification

The reason: Scan to BIM, a workflow that captures real conditions and digitally recreates them. Many AEC firms now plan their budgets around Scan to BIM services cost and Scan to BIM pricing. They know that accuracy directly affects the delivery.
Even the data shows it!
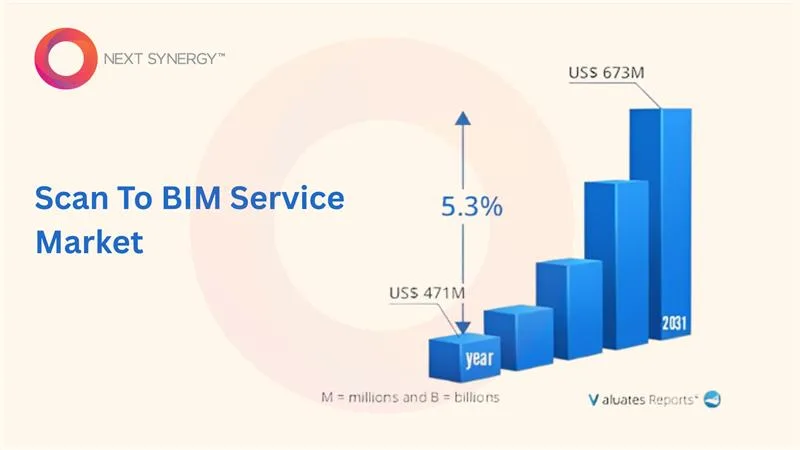
Valuates Reports suggests that the global Scan-to-BIM market in the US was valued at USD 471 million in 2024 and is expected to reach USD 673 million by 2031.
In 2026, businesses continue to adopt Scan to BIM as they demand faster delivery, fewer change orders, and reliable models. That’s why we have this guide explaining how Scan to BIM Services turn 3D scans into accurate, construction-ready BIM models.
What Is Scan to BIM?
Scan to BIM is a process that acts as a bridge between the site and the screen. It defines a process that converts real-world conditions into precise digital models with the help of 3D laser scanning and BIM software.
Teams use LiDAR scanners, drones, and handheld devices to capture existing conditions with precision. Every design and coordination decision is based on measured data. For example, when they work in Scan to BIM Revit, they generate models that are ready for construction, scheduling, and maintenance.
How Scan to BIM differs from traditional BIM
Both the Scan to BIM and traditional BIM strive for accuracy, but differ at the foundational level. For instance, Scan to BIM Services builds its foundation on as-built reality, but the traditional BIM usually finds its roots in design intent.
These are some of the differences to get started:
| Element | Traditional BIM | Scan to BIM |
| Starting Point | Starts with planned geometry and specifications. | Initiates with existing conditions captured through laser scanning. |
| Use Case | Perfect for new construction and conceptual design. | Highly recommended for renovation, retrofit, and facility upgrades. |
| Accuracy Level | Dependent on input drawings or assumptions. | Grounded in millimetre-accurate field data. |
| Core Output | Design-based model. | Verified as-built model ready for coordination and facility use. |

The Technology Behind Scan to BIM
What drives Scan to BIM is the advanced scanning tools. These tools capture every inch of a structure in digital form. Teams in the AEC use LiDAR scanners, drones, or handheld scanners to collect data from different angles.
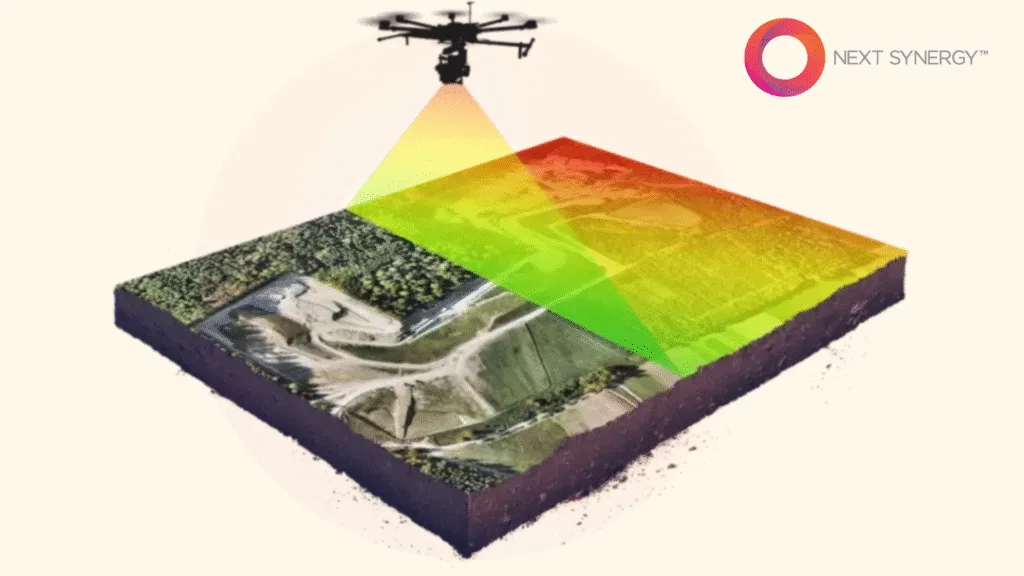
Together, they give a full 3D picture of the site that becomes the base of the model.
Role of Point Cloud Data
Every scan brings with it tons of data that comes from a dense collection of points. It’s called a point cloud, representing the geometry of the site.
This is how the point cloud data contributes to the Scan to BIM workflow:
-
- Captures spatial detail with millimetre-level precision
-
- Acts as a visual and geometric reference point to Revit or similar tools.
-
- Helps identify deviations between design intent and built conditions
-
- Let teams detect clashes and plan retrofits more efficiently
-
- Creates a verified record of the existing site for future maintenance or expansion
Major Scan to BIM Software in 2026
The software shared below does a ton of that work and offers something unique to every AEC business that needs BIM modeling services.
-
- Autodesk ReCap processes raw scans into clean point clouds
-
- Autodesk Revit can turn processed point clouds into intelligent BIM models
-
- Leica Cyclone REGISTER 360 stands out for how it simplifies scan alignment and registration
-
- Trimble RealWorks gives an advanced point cloud analysis and sectioning tools
-
- Bentley Pointools lets you optimize large scan files for visual clarity
Scan to BIM Process in 5 Clear Steps
There’s a clear sequence to every Scan to BIM project, where each step contributes to an added layer of accuracy.
These five steps set the base for success.
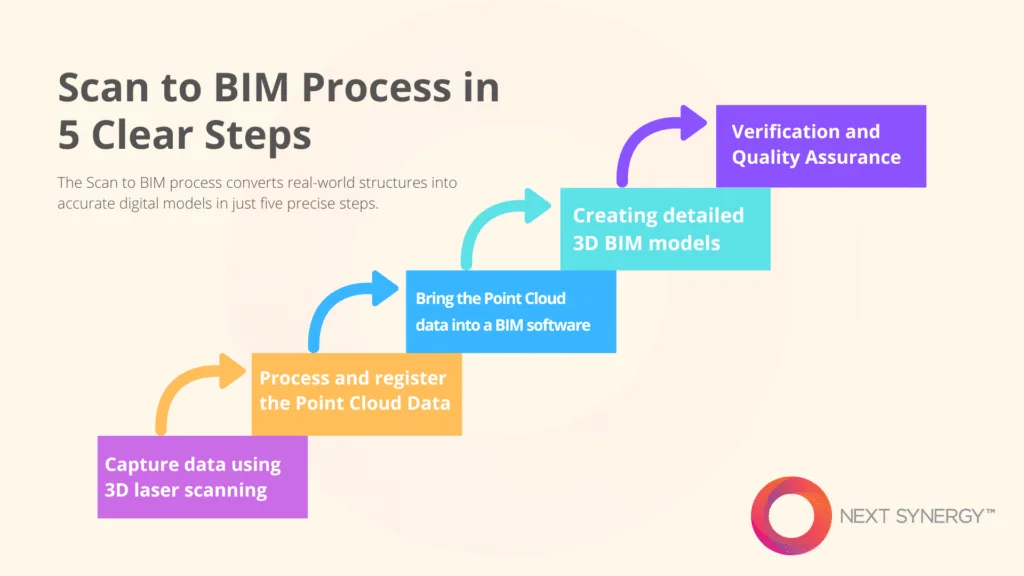
Capture data using 3D laser scanning
The scanning team sets up 3D laser scanners, LiDAR sensors, or drones to collect every visible surface, edge, and structural element in detail. Scanners throw laser pulses. They bounce back to the device to measure distance with high precision.
Key actions in this step:
-
- Setting up scanners or drones strategically
-
- Calibrating equipment to make sure of uniform accuracy throughout the scanning session
-
- Record multiple scans from different positions
-
- Capture environmental data like lighting, angles, and obstructions
-
- Store the raw data securely with location tags and timestamps for easy alignment later.
Process and register the Point Cloud Data
After completing the scanning step, the files head to the processing desk. Every scan will have small variations in alignment or lighting. So, processing removes the noise, filters out irrelevant points, and cleans up overlaps.
You also define the foundation of the Scan to BIM model because if the recorded data is off, the accuracy of the model may fall apart.
Some of the key action items here are:
-
- Importing raw scan files into processing software such as ReCap, Cyclone, etc.
-
- Clean the scans by removing noise such as stray points caused by dust, reflections, moving objects, or surface glare
-
- Align and stitch multiple scans together to form one cohesive point cloud and verify through visual checks
-
- Export the registered point cloud into a manageable format, ready for BIM modeling tools
Bring the Point Cloud data into a BIM software
Once the point cloud is clean and properly registered, it is moved into the BIM environment to begin modeling. At this step, turn raw spatial data into a usable reference for design and detailing. Also, modelers can trace over the point cloud to recreate architectural, structural, and MEP components.
Typically, the following actions happen:
-
- Import the registered point cloud into the best BIM software
-
- Set up project coordinates, levels, and reference planes
-
- Check if the cloud is aligned against control points or survey data
-
- Slice the cloud into manageable sections (floors, elevations, or zones) for better visibility
-
- Save and link the point cloud file for continuous reference
Creating detailed 3D BIM models
This step will have modelers building the structure in detail. They trace over the scans, recreate the geometry, and assign properties to components such as walls, slabs, columns, beams, ducts, and fixtures.
Most action items here are:
-
- Reconstructing architectural, structural, and MEP elements
-
- Adding parameters such as dimensions, material types, and component IDs
-
- Checking for model accuracy
-
- Following set modeling standards so details stay uniform across architecture, structure, and MEP
-
- Tagging key assets to support facility management and lifecycle data use
Verification and Quality Assurance
The final step is when the teams ensure that everything modeled accurately reflects what exists on-site. Every component, from structural columns to small MEP fittings, gets checked against the scan data for accuracy.
Teams usually inspect geometry, dimensions, and alignment to make sure the model meets both client and project standards.
The major action items at this stage are:
-
- Overlaying the final BIM model with the point cloud
-
- Running clash detection tests to see if they overlaps between architecture, structure, and MEP systems
-
- Checking Level of Detail (LOD) compliance
-
- Reviewing model outputs through visual walkthroughs or QA reports

Where is Scan to BIM applicable today?
There are plenty of areas where you can witness the application of Scan to BIM. In general, it is seen in renovation, facility management, and large-scale infrastructure.
The following Scan to BIM application stands out.
Renovation and restoration of existing buildings
Teams can define existing spaces in detail using Scan to BIM. They’d usually capture walls, beams, service lines, and finishes. For example, a contractor can restore a commercial tower using the scan data to detect deviations in slab levels.
Historical preservation projects
Heritage sites demand precision and sensitivity. So Scan to BIM can help capture delicate features such as arches, ornaments, or stone details. For example, preserving an old cathedral will need laser scans to document fine carvings and façade conditions as well.
Infrastructure and MEP coordination
Infrastructure and MEP systems require a precise alignment to prevent clashes, which is often possible with Scan to BIM. For instance, bridge retrofitting or subway expansion may require scanning existing structures to reroute services safely.
Major Challenges and Considerations Before Adopting BIM to Scan
Like with any advanced workflow, even Scan to BIM has its own set of hurdles. These challenges don’t necessarily mean limited potential. But it opens the way for teams to plan, budget, and execute their projects.
There’s a high upfront cost of scanning equipment
Laser scanners, drones, and LiDAR sensors require significant upfront investment unless you outsource the scanning work. But those planning to own equipment should factor in the cost of hardware, calibration, and software licenses.
You need skilled professionals and proper training
Scan to BIM requires teams to understand how scanning works, how to process point clouds, and how to model with discipline-specific accuracy. That’s why regular training and certifications help improve output quality.
Concerns around the accuracy of the model and compliance
Even the most detailed scans can fall short if the modeling doesn’t meet project standards. This is why teams need to establish LOD levels, naming conventions, and QA checks before the modeling.
Read More : What are the biggest challenges of implementing BIM in construction projects today?
How to Make the Choice for a Perfect Scan to BIM Partner
The Scan to BIM company you choose to work with will decide how smoothly your project runs. A reliable partner understands site conditions, handles data precisely, and even aligns their process with your project goals.
Here’s what you need to consider to choose the right BIM services provider.
Look for key qualities
Work with a team that blends technical skill with real project experience. Make sure they have a proven record in 3D laser scanning, BIM modeling, and coordination for both architectural modeling services and infrastructure projects.
Emphasize experience, technology, and quality control
This is non-negotiable. You’d need seasoned providers who invest in modern scanners, advanced Scan to BIM software, and put in place some stricter quality checks at every stage. For starters, consider partners who keep their workflows aligned with ISO and LOD standards.
Outsource Scan to BIM in a way that adds value
Outsourcing allows saving on equipment costs and tapping into specialized expertise without overloading in-house teams. That’s how partnering with an experienced Scan to BIM company helps you focus on design and execution while they manage the technical backbone.
What Next?
As we speak, the future of BIM is already unfolding. There are already AI-driven automations in place that speed up and improve the reliability of object recognition. Also, AR and VR integrations allow teams to walk through digital twins long before construction begins. These innovations will only sharpen how the industry plans, coordinates, and builds.
Over the past few years, Scan to BIM has moved from being a specialized tool to a practical necessity. It bridges the gap between the field and the office, reduces rework, and gives teams the clarity to build with confidence.
For construction and architectural firms, 2026 is the right time to make the shift. Consult a Scan to BIM Services provider who can help modernize your workflow, cut project delays, and help you stay ahead.